
Overview of functions
Python is an object-oriented language. Thus, functions are used to create objects or modify an existing object. Functions are a block of code that only runs when it is called. You can pass data, known as parameters, into a function. A function can return data as a result.
So, we assign them to variables, store to lists, pass them as arguments to other functions, create them inside functions and even produce a function as a result of a function
Make sure to keep in mind that:
Functions need to be “pure” meaning that if you call it again with the same inputs you get the same results. sys.time() not a “pure” function
The execution of the function shouldn’t change global variables, have no side effects.
Functions should be small and do one thing, but can have many arguments.
# Function definition with a docstring
def greet(name):
    """
    This function greets the person whose name is passed as a parameter.
    """
    return f"Hello, {name}!"

# Calling the function
print(greet("Alice"))  # Output: Hello, Alice!

# Function with default parameters
def power(base, exponent=2):
    return base ** exponent

# Calling the function with and without the default parameter
print(power(3))       # Output: 9
print(power(3, 3))    # Output: 27

# Function with variable-length arguments
def sum_all(*args):
    return sum(args)

# Calling the function with a variable number of arguments
print(sum_all(1, 2, 3))  # Output: 6

# Function with variable-length keyword arguments
def print_info(**kwargs):
    for key, value in kwargs.items():
        print(f"{key}: {value}")

# Calling the function with keyword arguments
print_info(name="Alice", age=30)

# Lambda function
square = lambda x: x * x
print(square(5))  # Output: 25

# Higher-order function
def apply_function(func, value):
    return func(value)

# Using a higher-order function
print(apply_function(square, 4))  # Output: 16

# Closure example
def outer_function(msg):
    def inner_function():
        print(msg)
    return inner_function

# Creating a closure, passing the function to a variable, that creates a function and calling it.
closure = outer_function("Hello, World!")
closure()  # Output: Hello, World!
Hello, Alice!
9
27
6
name: Alice
age: 30
25
16
Hello, World!
Let’s build a function!
Below, we construct a functional.
def my_mean(x):
    Sum_val = sum(x)
    N = length(x)
    return(Suml/N)  # return is optional but helps with clarity!
Create a little list and pass it to the function and see if it works. Also call the Sum and N variables...does this work?
Now, let’s construct a “function factory” or a function that returns a function. This is a higher-order function.
def power1(exp):
    def action(x):
        return x**exp
    return action
square = power1(2)
cube = power1(3)print(square(3), cube(3))9 27
Quick exercise
Create a function that computes the range of a variable and then, for no good reason, adds 100 and divides by 10. Write out the steps you would need first in Pseudocode, then develop the function.
Pseudocode:
(enter here)
# develop function herepandas functions
df.query() -- Pick observations by their values
df.sort_values() -- Reorder the rows
df.loc[] -- Pick variables by their row or column names and/or conditions -- note: There are several other ways to select or exclude data, so we will go over these at greater length in this document
df.assign() -- Create new variables with functions of existing variables
df.describe() -- Collapse many values down to a single summary
.query()
Using .query(), we retrieve all variables that fulfill some Boolean (True/False) expression.
For more, check out the documentation: https://
Example
For this, we want to load the mpg dataset built in to the R library. While R has its own built-in data library, Python does not. To use the same datasets, we will use the library pydataset. If you do not have the module installed, follow these instructions:
Open your command window or Terminal.
Type ‘pip install pydataset’
It should now work!
import pandas as pd
from pydataset import data # need to pip install this package, not part of the conda distubution
mpg_data = data('mpg')
mpg_data.head()Now, we set a criteria for the data. Maybe we only want 4-cylinder vehicles:
filtered_mpg = mpg_data.query('cyl==4')
filtered_mpg.head()Now, you try an example! Try only retrieving data where cty > 20 and the manufacturer is ‘volkswagen’
.sort_values()
You use this to sort rows or columns in a DataFrame based on the values in specific columns. Consider the following parameter structure:
df.sort_values(by, axis=0, ascending=True, inplace=False, kind=‘quicksort’, na_position=‘last’, ignore_index=False, key=None)
The most important parameters for this course are by, ascending, and, possibly, ignore_index and na_position.
by refers to the name or list of names you’re sorting values by. Typically, you might be sorting rows based on alphabetical names. For this, you’d enter df.sort_values(by='names').
ascending refers to whether you want to sort in ascending or descending order. If you want to sort in reverse alphabetical order, just enter ascending=False.
ignore_index asks whether you want the indices of the rows to mark their original order. If you’re using some subset and don’t care, it just orders the values from 0 to n-1 (when ignore_index=True).
na_position marks where you want your NaNs placed. The default is at the end, but if you want them at the beginning, type na_position=first
For more information, check out the documentation! https://
Example
Now, let’s consider an example! We’ll continue using the same mpg dataset we used in the previous example. Let’s say we want to sort by year.
sorted_mpg = mpg_data.sort_values(by='year')
sorted_mpg.head()Now, I also want to find the highest cty mileage in the most recent years. Let’s re-sort it:
sorted_mpg2 = mpg_data.sort_values(by=['year', 'hwy'], ascending=False)
sorted_mpg2.head()Now, maybe I’m trying to get a list of the top 5 cars based on those criteria, and I don’t care about the initial indices. To fix that, I could just ignore the indices:
sorted_mpg3 = mpg_data.sort_values(by=['year', 'hwy'], ascending=True, ignore_index=True)
sorted_mpg3.head()Now you try! Try sorting the data by model and hwy mileage in either ascending or descending order.
.loc[] (and slicing)
There are many ways to select or exclude columns in Python. The first option, if presented two columns you’d like you keep is through slicing. You’d do so like this:
df = df[['col1', 'col2']]
Alternatively, you could get the same result from:
df = df.loc[:, 'col1':'col3']
Common questions about this method:
What’s up with the colon?
.loc[] has two positions: the rows and columns. : means that we want to keep all rows associated with these columns.
We only want col1 and col2; why does it go to col3?
Slicing in Python is upper-bound exclusive. This means that the upper bound is not actually included in the final product, so you go one above the desired value.
In other scenarios, you might have many columns you want to keep and a few you want to remove. For this, the easiest method is .drop(). Consider:
df = df.drop([cols to drop as list], axis=1)
Why am I using axis=1? Because this drops the columns instead of the rows. Consider -- how else could you use .drop()?
Example
Let’s try a few examples! This time, we’ll upload a dataset from our data library (make sure you’ve cloned the repo for easy access! If you haven’t, check out this page for instructions: https://
weather = pd.read_csv('../data/weather.csv')   # Tip: use read_excel if using an excel file! Also this may need to be changed to the correct path,
# depending on your directory structure.
weather.head()Let’s select only columns referring to daily data.
One thing you’ll notice is that R uses the startswith() function in their select method. We can do something similar, but I’ll show you the long way first.
day_cols = [col for col in weather.columns if col.startswith('d')]

weather_daily = weather[day_cols]   # this is method 1; I have all days in a list of strings

weather_daily.head() # just looking at the first 5 rowsThis is an example where understanding these tools is important. We could also use .filter(), which we discussed earlier, using regular expressions (regex).
weather_daily2 = weather.filter(regex='^d')
weather_daily2.head()If you’re interested, here is a regex cheat sheet: https://
Now you try! Select only the first 7 days of data.
# select rows here.assign()
Using .assign(), you can create new independent columns or variables from the pre-existing ones themselves.
Example
We’ll return to the mpg dataset. We’ll change the city and highway mileage to km/l from mpg. This will involve multiplying all columns using mpg by 1.6 and dividing by 3.8
km_conv = mpg_data.assign(cty=mpg_data.cty * 1.6 / 3.8, hwy = mpg_data.hwy * 1.6/3.8)
km_conv.head()As you’ll see, in .assign(), you need to specify where the column data you are using comes from. This can be done using mpg_data['cty'] or mpg_data.cty depending on your preference. In R, you don’t need to specify the DataFrame. In Python, however, this is useful if you want to develop the column values based on some prior iteration of the DataFrame as R’s mutate() operates on itself by definition.
Now, you try! Create a new variable or edit a pre-existing variable (defining a variable that does not yet exist creates a new column).
.describe()
This function creates summary statistics based on your data!
Example
Let’s try it on the mpg data!
mpg_data.describe()We could also compare it to the converted mpg data.
km_conv.describe()You’ve likely noticed that only the numeric data types are displayed here. For more information on your types of variables, you can use .info(), which also provides information about other data types (i.e. the DataFrame). .info() is equivalent to str() in R.
mpg_data.info()<class 'pandas.core.frame.DataFrame'>
Int64Index: 234 entries, 1 to 234
Data columns (total 11 columns):
# Column Non-Null Count Dtype
--- ------ -------------- -----
0 manufacturer 234 non-null object
1 model 234 non-null object
2 displ 234 non-null float64
3 year 234 non-null int64
4 cyl 234 non-null int64
5 trans 234 non-null object
6 drv 234 non-null object
7 cty 234 non-null int64
8 hwy 234 non-null int64
9 fl 234 non-null object
10 class 234 non-null object
dtypes: float64(1), int64(4), object(6)
memory usage: 30.0+ KB
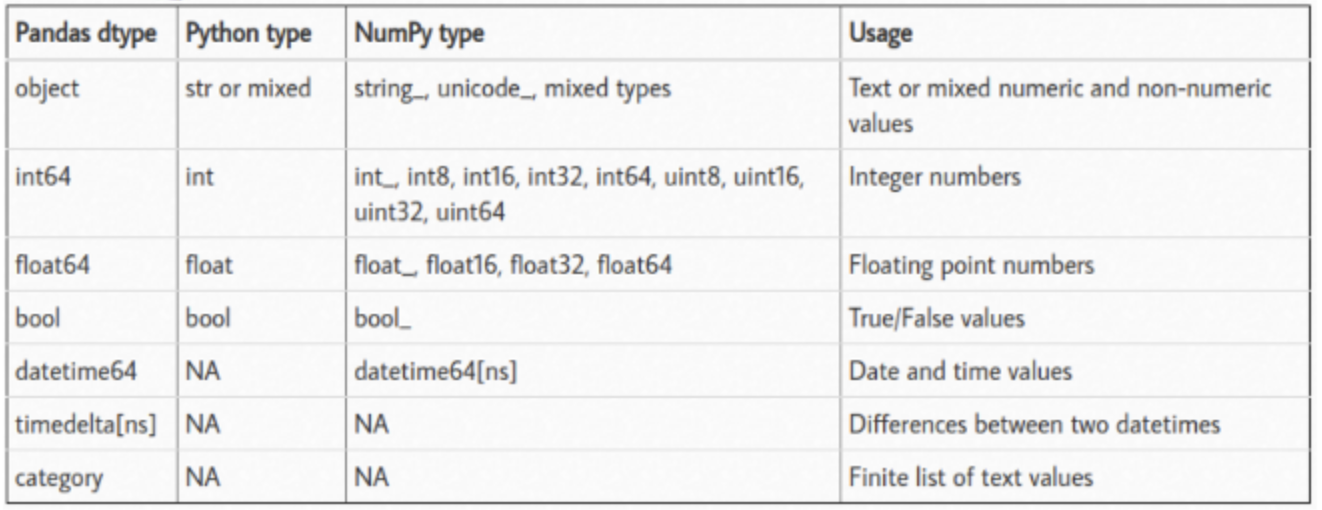
Below, we’ve included a table of the pandas basic data types. In general, you’ll want to display certain information differently or will need to know your data types so you can fix potential issues (e.g. maybe you want to some calculation on some values but they’re in string format rather than numeric).
Basic data types in pandas
Some other Python Basics
# How to check our current working directory
import os
os.getcwd()'/workspaces/DS-3021/02_function_basics'# How to load data in Python using Pandas and a relative path
data = pd.read_csv("../data/bank.csv") # Here we are using the relative path to load data from the data folder, thus the "..". Additional Python Basics
1. Basic Data Types and Operations:
Python supports several basic data types including integers, floats, strings, lists, and dictionaries. Common operations include arithmetic operations, string manipulations, and list operations.
# Basic Data Types
integer = 10
floating_point = 3.14
string = "Hello, World!"
my_list = [1, 2, 3, 4, 5]
my_dict = {"name": "Alice", "age": 30}

# Operations
sum_result = integer + floating_point  # Addition
upper_string = string.upper()  # Convert to uppercase
list_length = len(my_list)  # Get length of list
dict_value = my_dict["name"]  # Access dictionary value
2. Control Flow:
Control flow statements include if, for, and while statements. These statements allow you to control the execution of your code based on conditions and loops.
# If statement
if integer > 5:
    print("Integer is greater than 5")

# For loop
for i in my_list:
    print(i)

# While loop
count = 0
while count < 5:
    print(count)
    count += 1
Integer is greater than 5
1
2
3
4
5
0
1
2
3
4
3. List Comprehensions:
List comprehensions provide a concise way to create lists. They consist of brackets containing an expression followed by a for clause.
# List comprehension to create a list of squares
squares = [x * x for x in my_list]
print(squares)  # Output: [1, 4, 9, 16, 25]
[1, 4, 9, 16, 25]
4. Classes and Objects:
Python is an object-oriented language, and classes are used to define new types of objects.
A class defines the structure and behavior of the objects, and objects are instances of classes.
class Person:
    def __init__(self, name, age):
        self.name = name
        self.age = age

    def greet(self):
        return f"Hello, my name is {self.name} and I am {self.age} years old."

# Creating an object
person = Person("Alice", 30)
print(person.greet())  # Output: Hello, my name is Alice and I am 30 years old.
Hello, my name is Alice and I am 30 years old.